
🎯 Purpose
Use this SOP to help a patient complete check-in in the Besa Patient Intake App. It is intended for front-desk staff and other authorized team members who guide patients through account setup, required intake sections, and final check-in confirmation. The process is complete only when the app shows 100% Completed and Check-In Complete for the correct patient. Remember, we always want Patients to complete the intake by downloading our app. This is only to be used as a backup.
📚 Resources Needed
iPad
Besa Intake App
The patient's current contact information, address, insurance card, medical history, and approved payment method..
🚀 Tips & Tricks
The Patient can pay copay and after will be marked as Arrived automatically.
Guide, do not take over. Ask the patient to enter and confirm their own information whenever possible.
Only use this in the case of when a backup is needed.
The sign in works the same as the Patient app.
A Patient can create a walk in appointment, and they can see their upcoming appointment if they have one.
🔑 Key Points
Use status indicators. A green check and Done · Tap To Review mean the section is complete but can still be opened for review.
Expect saved information. A patient account can prefill information on future visits. The patient must still review the saved information and update anything that changed.
Complete required fields. An asterisk identifies a required field. If the app will not continue, review the page from the top for the first incomplete required field.
Treat zero as an amount. Review copays to the hundredth, including $0.00 or another amount displayed by the app.
Verify the result. Selecting Save, Continue, or Done is not enough by itself. Confirm the updated status on the check-in dashboard.
📘 Instructions
Step 1: Open The Correct Check-In And Review Progress
Patient signs in with the email address or phone number on file.
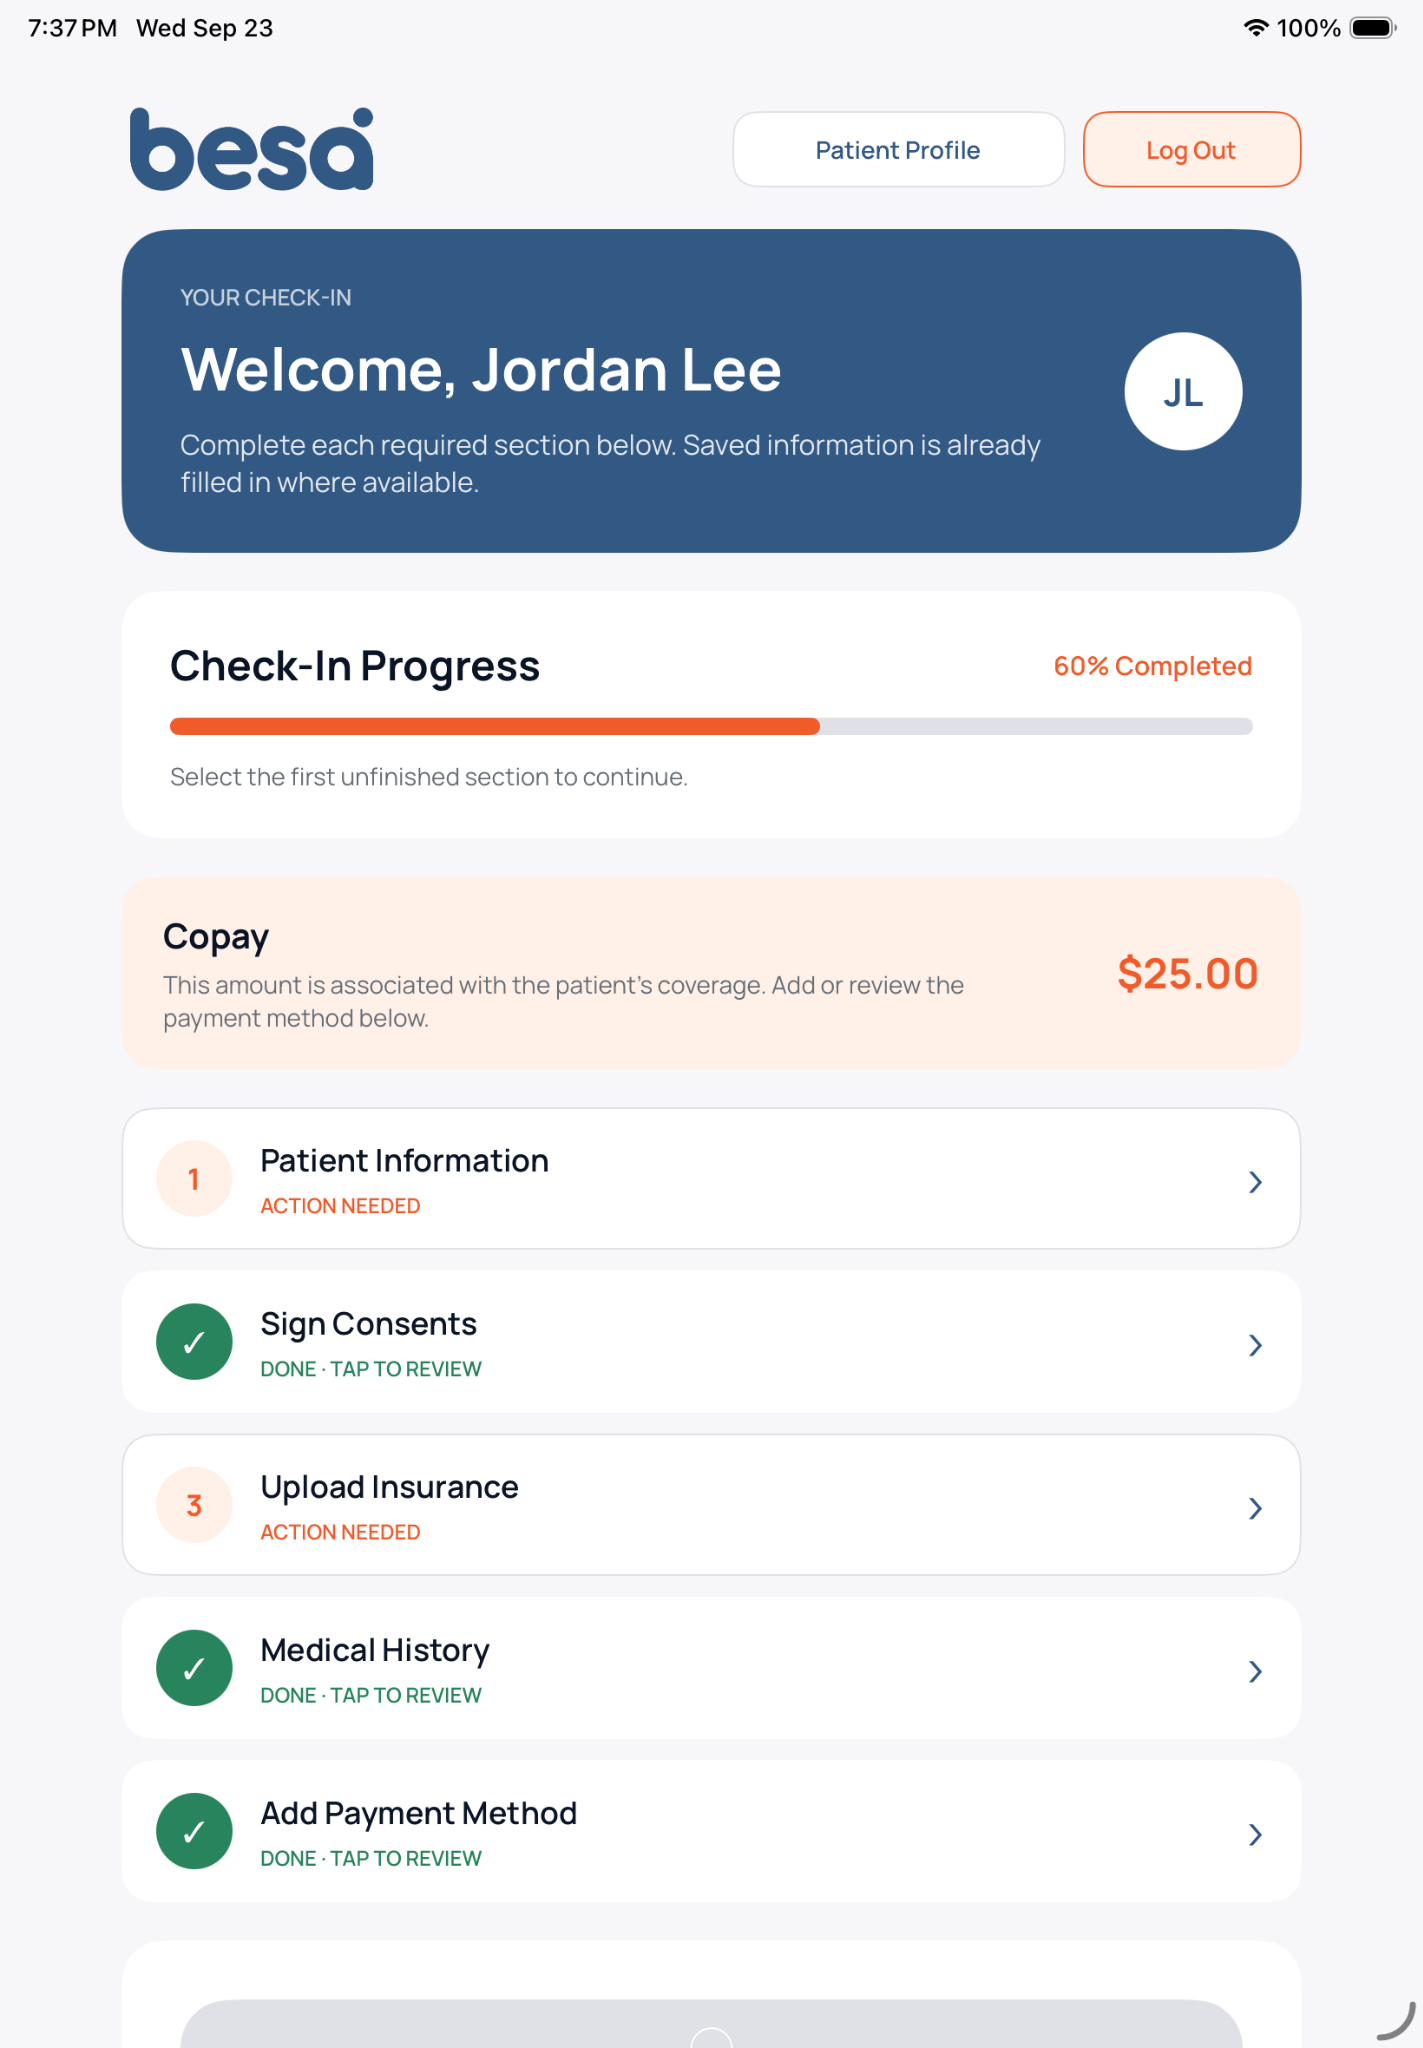
Review Check-In Progress, the displayed copay, and the status of each section.
Select the first section marked Action Needed. A section marked Done · Tap To Review can be reopened if the patient needs to check or change information.
If the patient name, appointment, or copay is incorrect, stop and return to the prior screen. Do not continue with the wrong record.
The check-in dashboard shows progress, the copay, and which sections still need action.
Step 2: Create A Patient Account When Needed
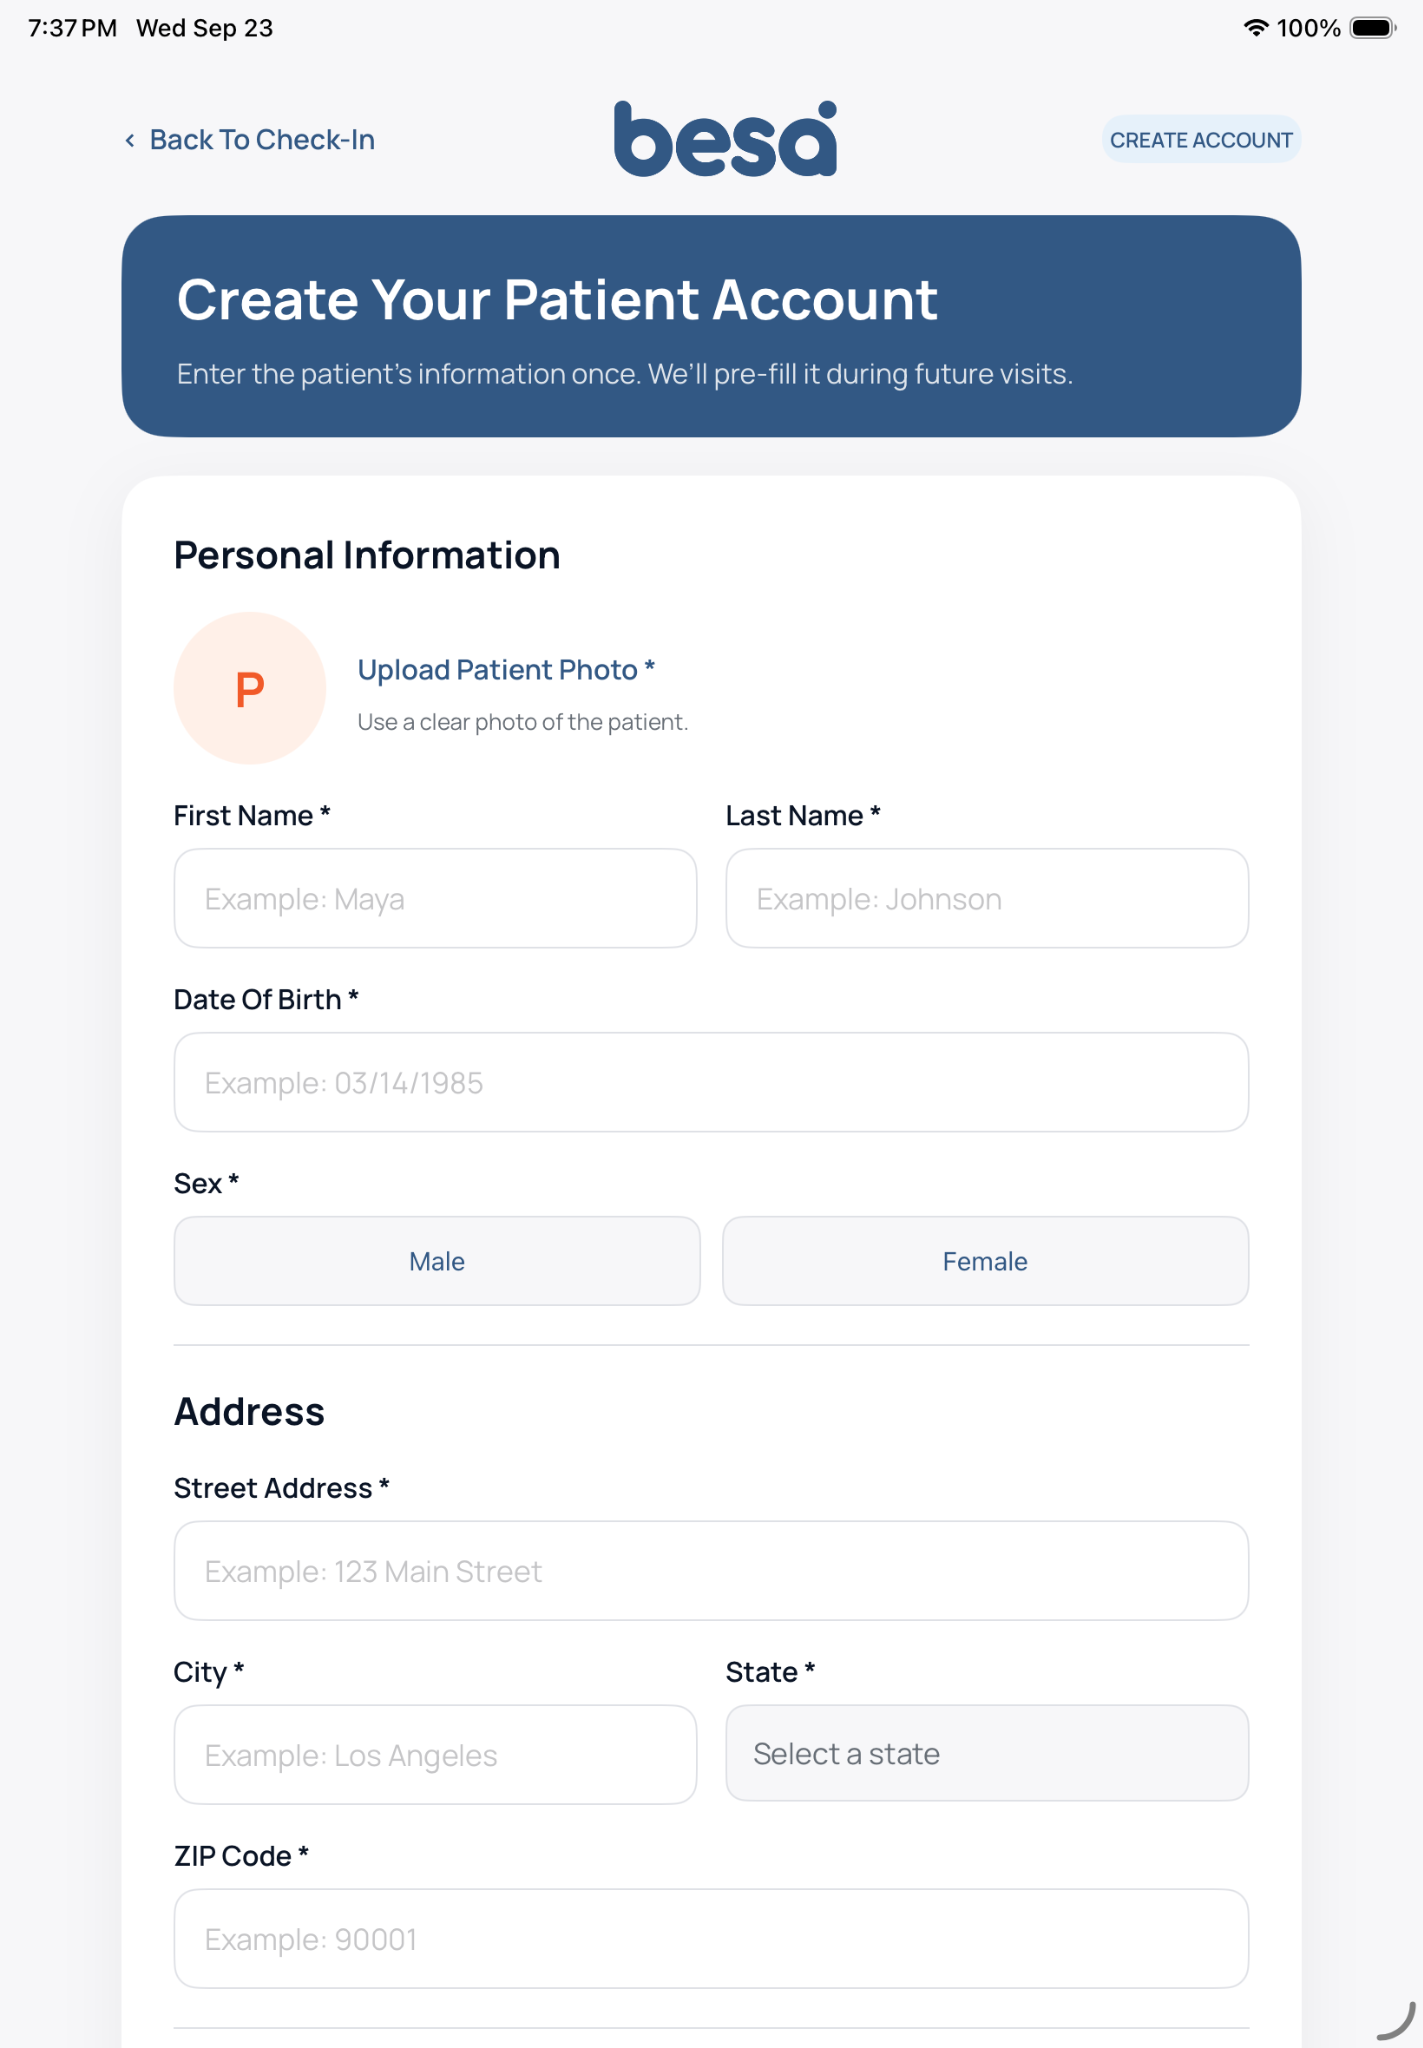
If the patient chooses Create Account, explain that saved information can be prefilled during future visits.
Select Upload Patient Photo and use a clear, current photo of the patient. If no photo is available and the app allows it, the patient's initials may appear instead.
Enter the patient's First Name, Last Name, Date Of Birth, and Sex exactly as confirmed by the patient.
Enter the current Street Address, City, State, and ZIP Code, then complete any additional required contact fields shown lower on the page.
Review every field marked with an asterisk before continuing.
Do not create another account if the patient may already have one. Return to check-in or contact Support if account status is unclear.
The Create Your Patient Account page collects the patient's photo, identity information, and address.
Step 3: Review Patient Information
Open Patient Information from the check-in dashboard.
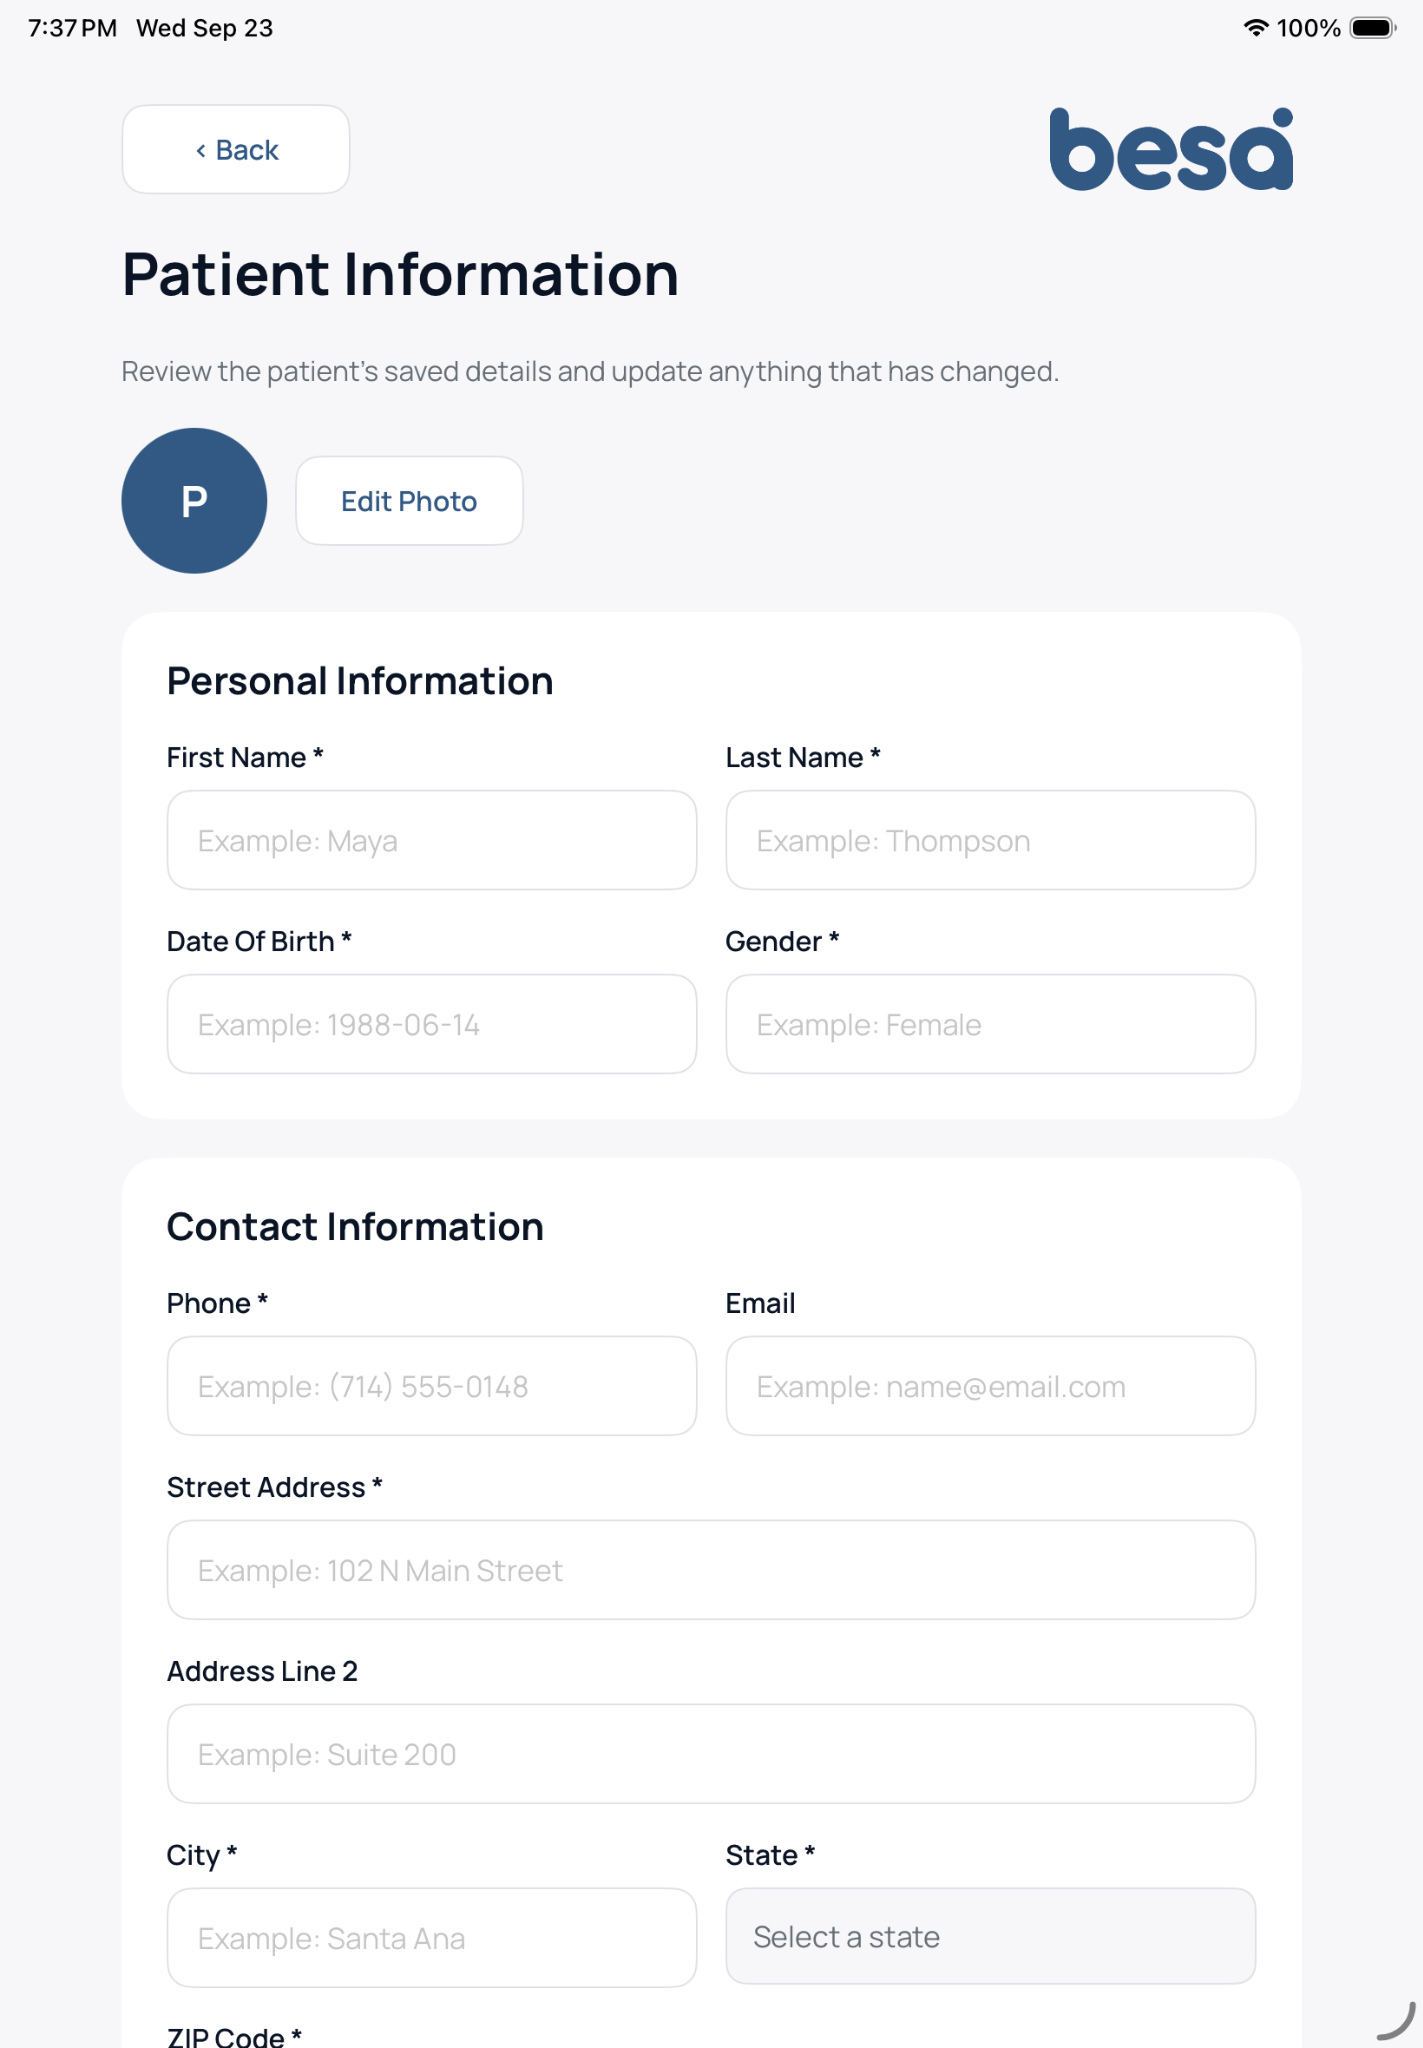
Ask the patient to review First Name, Last Name, Date Of Birth, Gender, Phone, Email, Street Address, Address Line 2, City, State, and ZIP Code.
Select Edit Photo if the patient needs to add or replace the saved photo.
Correct only information the patient confirms. Do not guess or replace verified information with temporary details.
Save or continue, then return to the dashboard and confirm Patient Information shows a green check and Done · Tap To Review.
The patient can select Patient Profile later to review saved details, but the current check-in must still be completed.
The Patient Information page lets the patient review saved personal and contact information.
Step 4: Sign Consents
Open Sign Consents.
Have the patient read each consent before signing or accepting it.
Confirm the consent applies to the correct patient and visit.
Do not sign for the patient unless your role and clinic policy specifically authorize it.
Return to the dashboard and confirm Sign Consents shows a green check and Done · Tap To Review.
Step 5: Upload Insurance
Open Upload Insurance.
Confirm the insurance belongs to the correct patient and is current for the visit.
Capture or upload the requested insurance-card images. Make sure the full card is visible, readable, and not covered by glare.
Review the member name and other displayed insurance details before continuing.
Return to the dashboard and confirm Upload Insurance shows a green check and Done · Tap To Review.
Do not upload unrelated documents or include unnecessary patient information.
Step 6: Complete Medical History
Open Medical History.
Ask the patient to answer each question accurately and review any information that was prefilled.
Do not guess, choose an answer for the patient, or change a clinical response without the patient's confirmation.
If an answer suggests an urgent or emergency concern, stop routine intake and follow your clinic's approved clinical escalation process.
Return to the dashboard and confirm Medical History shows a green check and Done · Tap To Review.
Step 7: Review The Copay And Payment Method
Review the copay displayed on the dashboard with the patient, including amounts such as $0.00 or $0.50.
Open Add Payment Method.
Confirm the patient approves the payment method and any amount due today before entering or submitting payment information.
Keep card information private. Never place complete card details in notes, screenshots, chat, or a Support request.
Return to the dashboard and confirm Add Payment Method shows a green check and Done · Tap To Review.
If a payment result is delayed or unclear, do not submit it again until the earlier attempt has been checked.
Step 8: Confirm Check-In Is Complete
Confirm Check-In Progress shows 100% Completed.
Confirm Patient Information, Sign Consents, Upload Insurance, Medical History, and Add Payment Method each show a green check and Done · Tap To Review.
Confirm the displayed copay is correct and no section still shows Action Needed.
Confirm the Check-In Complete message appears.
Select Done to finish the private kiosk session. If the patient is using a shared device, make sure the session closes before the next patient begins.
The final screen shows 100% Completed, green checks for every section, and Check-In Complete.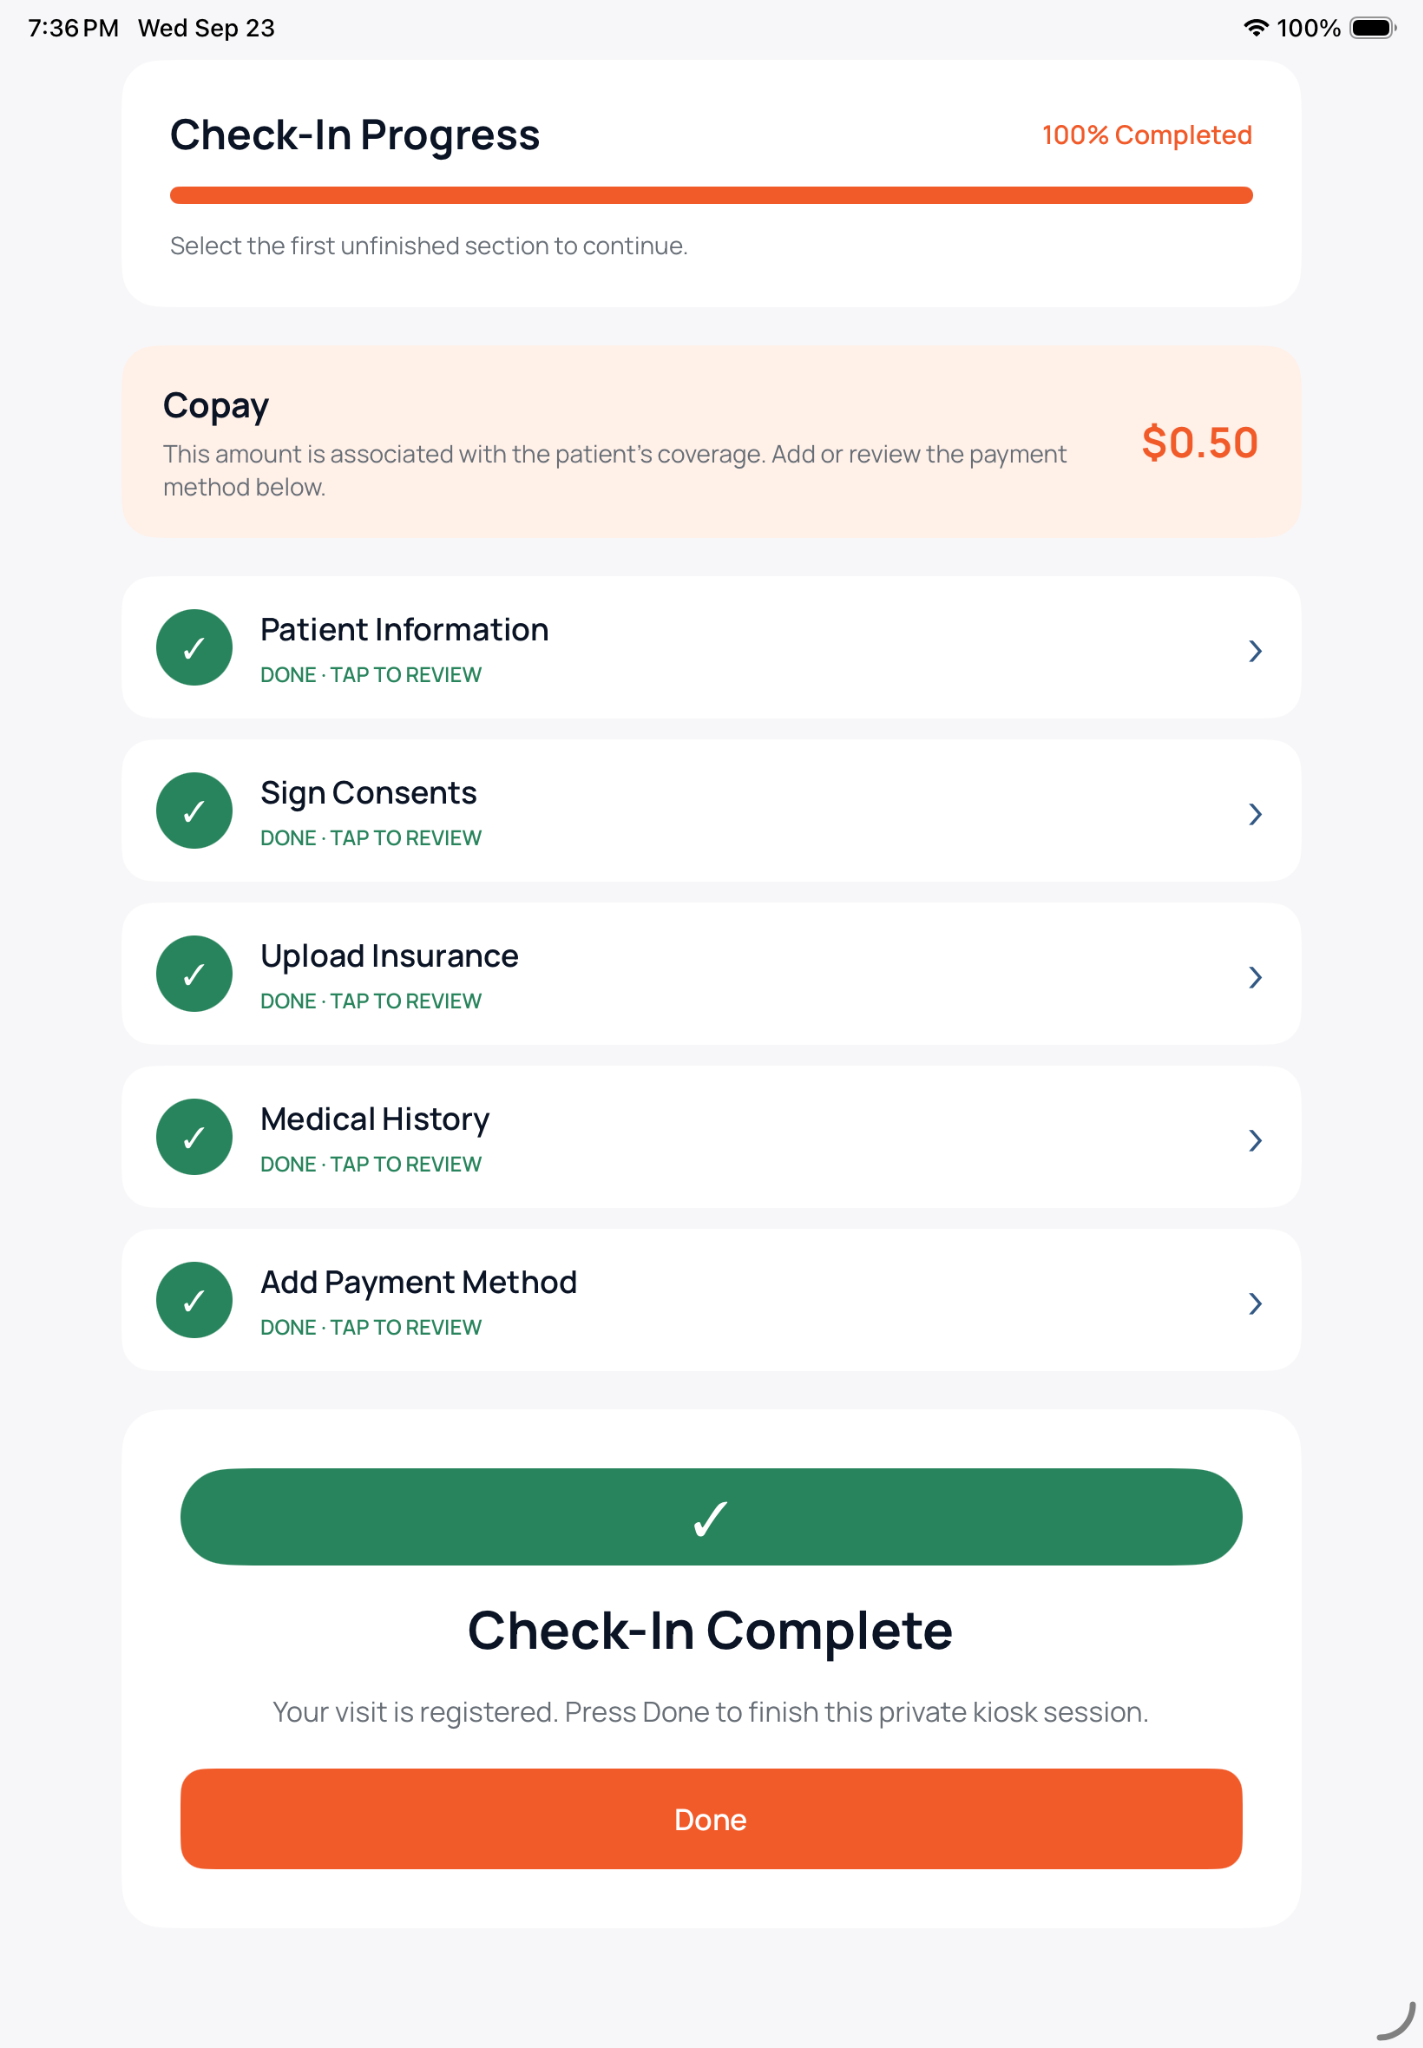
🛠 Troubleshooting
The App Will Not Continue Or A Required-Field Message Appears
Review the page from the top and complete the first missing field marked with an asterisk.
Confirm dates, phone numbers, ZIP Codes, and other formatted values use the format requested by the field.
Correct the field and try Continue or Save once more.
If the same message remains, capture the visible error and contact Support. Do not include unnecessary patient information.
The Patient Information Is Incorrect
Stop and confirm the patient's full name and date of birth.
Correct only information the patient verifies.
If the screen belongs to another patient, select Back or Log Out and end the session. Do not continue or save changes.
Contact Support if the correct patient cannot be opened. Provide the patient ID, appointment date, and a screenshot with unrelated information hidden.
An Account May Already Exist
Do not create a second account.
Return to the check-in screen and try the patient's existing sign-in method if available.
Contact Support if account status remains unclear. Provide the patient's name, date of birth, and the email or phone number the patient expected to use; do not send passwords.
A Photo Or Insurance Image Will Not Upload
Confirm the device has camera or photo-library permission and an internet connection.
Retake the image in good light with all four corners visible and no glare.
Try the upload one more time.
If it still fails, capture the visible error and contact Support. Do not send complete insurance images through an unapproved channel.
A Section Does Not Change To Done
Reopen the section and review it from the top for a missing required field, signature, image, or confirmation.
Complete the missing item, then return to the dashboard.
Refresh the page once if the status does not update.
Do not start another check-in. Contact Support if the section still does not show Done.
The Payment Result Is Delayed Or Unclear
Do not enter or submit the payment again.
Check the dashboard and the approved payment record for a completed or pending result.
Contact Support before retrying if a charge may already exist.
Provide the patient ID, appointment date, amount, approximate time, and visible status. Never provide a full card number or security code.
Check-In Does Not Reach 100%
Look for any section still marked Action Needed.
Open that section, complete the missing item, and return to the dashboard.
Refresh the page once if every section has a green check but progress is not 100%.
Contact Support if the result remains unclear. Provide the patient ID, appointment date, affected section, approximate time, and a screenshot with unrelated patient information hidden.
✅ Completion Check
The patient's intake is complete only when:
The correct patient name and appointment were confirmed.
Check-In Progress shows 100% Completed.
Every required section shows a green check and Done · Tap To Review.
The displayed copay was reviewed and the approved payment result is clear.
The Check-In Complete message appears.
Done was selected and the private or shared-device session ended.
No duplicate account, check-in, insurance upload, consent, or payment was created.
No unnecessary patient information or complete payment details were placed in screenshots, notes, chats, or Support requests.
Comments (0)