
This SOP protects patients, staff, waste handlers, and confidential information by requiring immediate sorting at the point of use, secure onsite storage, monthly vendor pickup when legally permitted, and documented disposal or destruction.
The Rules Everyone Must Know
Put qualifying non-sharp biohazardous medical waste into a red biohazard bag at the point where it is generated.
Put every needle, syringe with an attached needle, lancet, scalpel, and other contaminated sharp directly into the approved sharps container in that exam room. Never place loose sharps in a red bag.
Place confidential paper in a locked shred console. Never place protected health information in ordinary trash or recycling.
Do not put chemicals, medications, controlled substances, batteries, aerosols, or electronic waste into a red bag. Stop and ask the Clinic Manager for the approved waste stream.
Immediate danger or major spill: protect people first, restrict access, call 911 when there is fire, uncontrolled release, serious exposure, or another emergency, and follow the Safety Data Sheet and emergency instructions.
Waste Sorting Guide
Use this guide before placing anything into a container. When the correct stream is uncertain, keep the item where it can be controlled, prevent access, and contact the Clinic Manager. Do not guess.
Responsibilities
📚 Resources Needed
Red, water-resistant biohazard bags with required biohazard markings
Rigid, puncture-resistant, leak-resistant, closable, labeled FDA-cleared sharps containers in every exam room
Leak-resistant, tightly covered secondary biohazard container labeled on the lid and sides
Secure final storage area with required English and Spanish warning signage
Appropriate gloves, face and eye protection, gowns, disinfectant, absorbent material, tongs or forceps, and an approved spill kit
Locked shredding console and a documented records-retention schedule
Monthly pickup calendar, medical-waste tracking documents, invoices, and certificates of destruction
Current Safety Data Sheets for chemicals used at the clinic
✅ Before You Start
☐ Confirm that Orange County medical-waste generator registration or notification is current and matches the clinic's waste volume and onsite treatment status.
☐ Verify the red-bag container, sharps containers, final storage area, signs, spill kit, and locked shred console during an onsite walk-through.
☐ Confirm the approved vendor accepts each waste stream. Do not assume a red-bag service accepts medications, chemicals, controlled substances, chemotherapy, or pathology waste.
☐ Confirm the written monthly pickup schedule. Monthly pickup is permitted only while the clinic stays within applicable storage limits; the Clinic Manager must increase frequency when volume, odor, leakage, temperature, or law requires it.
☐ Post the exposure-reporting contact and make the Hepatitis B vaccination, exposure-control plan, and post-exposure process available to covered staff.
☐ Train staff before they handle medical waste or confidential destruction material and document the training.
🚀 Tips & Tricks
Keep the red-bag opening and sharps opening within easy reach of the work area so staff do not carry contaminated items across the room.
Mark a reorder point for empty bags and sharps containers before stock runs low.
Use the vendor pickup date as the monthly inspection date for the storage area, manifests, and shred console.
Ask MET to quote red-bag pickup, sharps exchange, and shredding on the same service route, but keep separate tracking or destruction records for each stream.
If a waste item is confusing, use its label and Safety Data Sheet and ask the Clinic Manager or vendor before disposal.
📘 Instructions
Step 1: Select, Use, And Store Personal Protective Equipment
Use PPE that prevents blood or other potentially infectious materials (OPIM) from reaching work clothes, undergarments, skin, eyes, mouth, or other mucous membranes under normal conditions of use.
Required onsite PPE includes water-repelling gloves, a clothing barrier or gown, face and eye protection such as goggles or a face shield, and respiratory-infection protection such as a mask.
General work clothes, uniforms, and cloth laboratory coats that allow liquid to soak through are not PPE. They are appropriate only when blood or OPIM will not penetrate to clothing, undergarments, skin, eyes, mouth, or other mucous membranes under normal use.
Store PPE in a clean, dry location protected from contamination, loss, damage, water, sunlight, and temperature extremes.
Step 2: Label And Secure Blood, OPIM, And Regulated Waste
Affix a warning label to red-bagged regulated waste, sharps containers, refrigerators and freezers containing blood or OPIM, containers used to store or transport blood or OPIM, and contaminated laundry or equipment being stored or transported.
Use the international biohazard symbol with the word “BIOHAZARD,” or the words “Biohazardous Waste,” in fluorescent orange or red-orange with contrasting lettering or symbols.
Label sharps containers with “Sharps Waste” or the international biohazard symbol and “BIOHAZARD.”
An individual container of blood or OPIM does not need its own warning label when placed inside a properly labeled secondary container for storage, transport, or disposal.
Alternative marking or color coding may be used for contaminated laundry or specimen containers only when onsite employees can recognize that Universal Precautions apply.
Keep regulated waste separate from other waste, place applicable waste in a red biohazard bag carrying the biohazard warning, and store it in a closed container inaccessible to unauthorized people.
Secure the infectious or biohazardous-waste storage area against unauthorized access and mark it with a warning sign.
If waste is stored outside the office, lock the entry door, gate, or receptacle lid and post the required English and Spanish warning signs so they are visible from 25 feet.
Step 3: Identify Regulated, Biohazardous, Medical, And Sharps Waste
Regulated waste includes biohazardous waste and medical waste. It includes laboratory waste; human specimens or tissue; blood or contaminated material known to carry a highly communicable disease or require isolation; liquid or semi-liquid blood or OPIM; items caked with dried blood or OPIM that can release material during handling; and contaminated sharps.
Biohazardous waste includes:
Laboratory waste and human specimen cultures from medical or pathology laboratories.
Waste from producing bacteria or viruses or using spores; discarded live and attenuated vaccines; and culture dishes or devices used to transfer, inoculate, or mix cultures.
Waste containing microbiologic specimens sent to a laboratory for analysis.
Human surgical specimens or tissue removed during surgery that the attending physician or surgeon suspects are contaminated with infectious agents contagious to humans.
Waste that contains recognizable fluid blood products at transport from the site, at disposal, or afterward.
Containers or equipment containing fluid blood products known to be infected with diseases highly communicable to humans.
Discarded material contaminated with excretions, exudates, or secretions from people isolated by infection-control staff, the attending physician or surgeon, or the local health officer to protect others from highly communicable diseases.
Medical waste includes biohazardous waste or sharps waste and waste generated by the diagnosis, treatment, or immunization of patients.
Sharps waste means a device with acute rigid corners, edges, or protrusions capable of cutting or piercing, including hypodermic needles, syringes, blades, needles with attached tubing, contaminated broken glass, Pasteur pipettes, and blood vials.
Handle and dispose of infectious waste in accordance with all applicable Orange County, Los Angeles County when relevant, and other local health laws and regulations.
Step 4: Prepare Every Exam Room
Install one approved sharps container in each exam room. Place it upright, secured against tipping, visible, and as close as practical to where sharps are used.
Keep the disposal opening accessible during procedures without placing the container where patients, children, or unauthorized persons can reach it.
Provide a red-bag receptacle appropriate to the room's workflow. Keep the bag supported and do not use the red receptacle for ordinary trash.
Inspect the container before the first patient and during room reset. Replace missing, damaged, leaking, improperly labeled, or overfilled containers before using the room.
Step 5: Dispose Of Sharps Immediately
After use, activate the engineered safety feature and place the entire sharp directly into the exam-room sharps container.
Do not recap, bend, shear, break, remove, pass hand-to-hand, or leave a used sharp on a tray or counter. Use an approved one-handed or mechanical technique only when a specific procedure requires recapping or removal and the exposure-control plan authorizes it.
Never push a sharp through the opening, reach into the container, or shake the container to make room.
Close and replace the container before it reaches the manufacturer's fill line. If it leaks or could be punctured, place the closed container into a compatible labeled secondary container without reopening it.
Move closed sharps containers to the secure final storage area for vendor collection. Install a new container in the exam room immediately.
Sharps rule: Sharps always go into the sharps container in each exam room. Loose sharps never go into a red bag, regular trash, laundry, or recycling.
Additional needlestick-safety requirements:
Use needleless systems, needles with Engineered Sharps Injury Protection (ESIP), and non-needle sharps, including in emergency kits, unless Cal/OSHA has approved an exemption under Title 8, Section 5193.
Place every device capable of cutting or piercing—including syringes, hypodermic needles, needleless devices, blades, broken glass, slides, and vials—into a closable, puncture-resistant, labeled, leak-proof sharps container. Containers made from different materials are acceptable when they meet all requirements.
Maintain security of every portable sharps container in patient-care areas at all times.
Do not fill a sharps container past the manufacturer’s designated line or more than three-quarters full. Keep enough replacement containers onsite for routine change-out.
Step 6: Select Safer Medical Devices
Use safety devices with these desirable characteristics:
The device is needleless whenever feasible.
The safety feature is an integral part of the device.
The device is easy to use and practical.
The device performs reliably.
The safety feature cannot be deactivated and remains protective through disposal.
The device works effectively and reliably, is acceptable to healthcare staff, and does not adversely affect patient care.
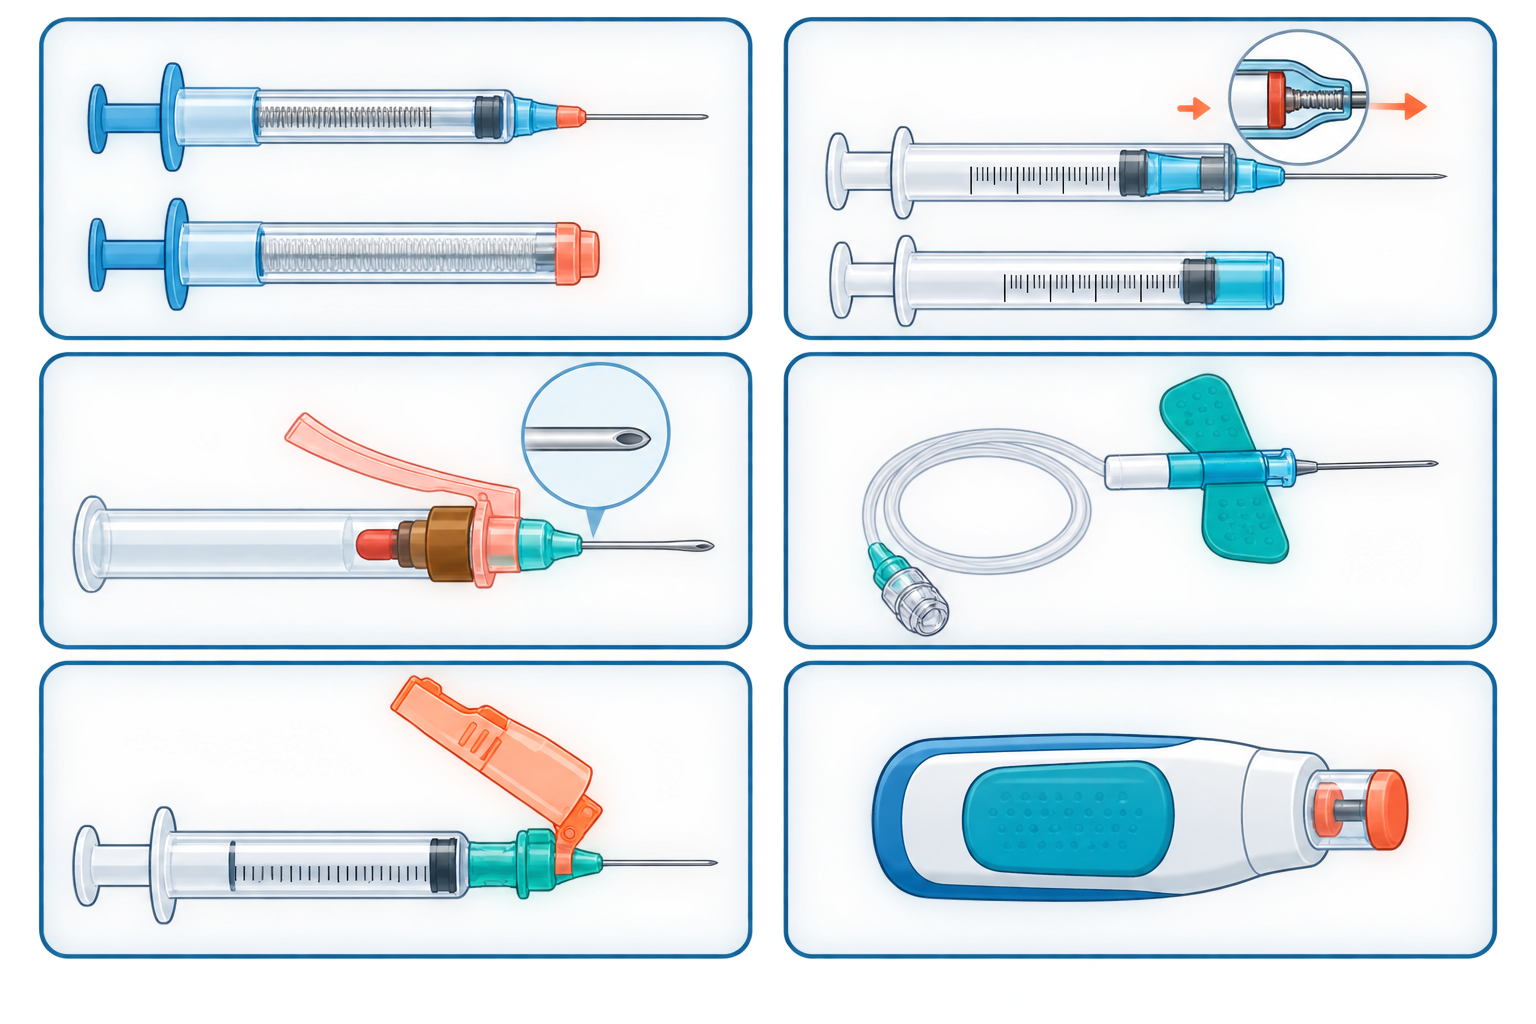
Original Besa Health safety-device examples, shown in order from top left to bottom right: self-resheathing needle; syringe with retractable needle; blunt-tipped blood-drawing needle; winged steel needle; add-on safety feature; retracting finger-prick lancet.
Step 7: Handle Contaminated Laundry
Treat laundry soiled with blood or OPIM as contaminated laundry.
Use a commercial laundry service or an onsite washer and dryer.
Do not place sharps in laundry. Apply the appropriate warning label when contaminated laundry is transported.
Follow the manufacturer’s instructions to decontaminate and launder reusable protective clothing.
Ensure laundry areas have handwashing facilities and products plus appropriate PPE for workers.
Mark this section not applicable only when all patient-care items, including gowns, pillowcases, and blankets, are disposable.
Step 8: Handle Red Bag Biohazardous Waste
Place qualifying non-sharp biohazardous medical waste into the red biohazard bag at the point of origin.
Keep ordinary trash, recyclables, confidential paper, medication, chemicals, and sharps out of the red bag.
Do not overfill, compact, push down, or reach into a red bag. Close the bag before it becomes difficult to tie or before contents create a leak risk.
Tie the bag to prevent leakage or expulsion. If the outside is contaminated or the bag leaks, place it into a second compatible red biohazard bag using appropriate personal protective equipment.
Promptly place the tied bag into the rigid, leak-resistant, tightly covered secondary biohazard container. Keep labels visible on the lid and sides.
Step 9: Secure Waste And Control Storage Time
Keep the final storage area locked or otherwise secured against unauthorized access and protected from animals and weather.
Post signs legible from 25 feet: “CAUTION—BIOHAZARDOUS WASTE STORAGE AREA—UNAUTHORIZED PERSONS KEEP OUT” and “CUIDADO—ZONA DE RESIDUOS BIOLÓGICOS PELIGROSOS—PROHIBIDA LA ENTRADA A PERSONAS NO AUTORIZADAS.”
Keep containers upright, closed, clean, in good repair, and separated by waste stream. Never use a trash chute, compactor, or grinder for untreated medical waste.
Track the clinic's biohazardous-waste weight each month. If the clinic generates less than 20 pounds per month, untreated biohazardous waste stored above 32°F may not remain onsite more than 30 days. If the clinic generates 20 pounds or more per month, the maximum is seven days unless the enforcement agency gives written approval.
Arrange earlier collection whenever a container reaches its fill line, a bag leaks, odor becomes a nuisance, the storage limit will be exceeded, or the vendor or enforcement agency requires it.
Step 10: Complete The Monthly Pickup or Upon Request
The Clinic Manager confirms the appointment, available container count, approximate weight, waste types, and secure access before pickup.
Only release medical waste to a transporter whose California registration is current on the pickup date and whose identity matches the service order.
Count the red-bag containers and closed sharps containers with the driver. Do not release any leaking, unlabeled, open, or rejected container until it is safely corrected under vendor instructions.
Review and sign the tracking document only after the quantities, waste types, generator address, transporter information, and date are accurate.
Receive replacement bags, secondary containers, and sharps containers as required. Confirm every exam room has a usable sharps container before patient care resumes.
File the tracking document, invoice, treatment or destruction record, and any exception note. Retain medical-waste tracking records for at least three years for a large-quantity generator and at least two years for a small-quantity generator, unless a longer period applies.
CalOptima Medical-Waste Disposal Requirements
Medical waste must be hauled by a registered hazardous-waste transporter to a permitted offsite medical-waste treatment facility, transfer station, or another registered generator.
The source protocol states that a limited-quantity exemption is not required for a small-quantity generator up to 35.2 pounds.
The medical-waste tracking document must include the transporter’s name, the number of waste containers—for example, three sharps containers or five biohazard bags—the types of medical waste, and the transportation date.
Retain tracking documents for at least three years for a large-quantity generator and at least two years for a small-quantity generator.
Mail-back systems are permissible under the California Health and Safety Code provisions cited in the source protocol. CDPH has not granted mail-back approvals since January 1, 2015, so each clinic must perform its own due diligence and confirm compliance with USPS medical-waste mailability standards.
Mail-back is not Besa Health’s standard disposal process while MET service is active.
MET Disposal And Shredding Vendor
Besa Health uses Medical Environmental Technologies, LLC, known as MET, for medical-waste disposal, sharps service, flexible monthly scheduling, hazardous-waste support, and document shredding. California’s current transporter materials identify Medical Environmental Technologies, LLC as registration 6210 with current status. Verify current registration and service terms before each renewal and periodically during service.
Medical Waste Disposal Vendor
Besa Health uses California Medical Waste Disposal as its biohazardous waste vendor.
Step 11: Destroy Confidential Documents Securely
Before destruction, confirm the document has met the approved legal, clinical, billing, litigation-hold, audit, and organizational retention requirements. If unsure, stop and contact the Privacy Officer or records owner.
Place approved paper into the locked shred console immediately. Do not leave confidential paper in an open box, on a counter, or in ordinary trash or recycling.
Do not retrieve documents from the console. Report an accidental deposit immediately to the Privacy Officer and follow the vendor's secure retrieval procedure.
Limit keys and access to authorized people. Keep the console closed and report damage, overflow, or tampering immediately.
Use a shredding vendor under appropriate written privacy and security terms, including a business associate agreement when required. Confirm the vendor's identity before releasing the console or bins.
Obtain a certificate of destruction showing the service date and scope. File it with the shredding log without listing patient names or unnecessary protected information.
Step 12: Respond To A Spill Or Container Failure
Stop work, keep people away, and assess whether the release can be handled safely by trained staff with the available spill kit.
For a chemical, medication, aerosol, mercury, unknown material, strong odor, fire risk, or large release, do not improvise. Follow the Safety Data Sheet, isolate the area, and contact the Clinic Manager, vendor, emergency responders, or hazardous-material response as appropriate.
For a small blood or other potentially infectious material spill, put on appropriate personal protective equipment, contain the spill, pick up broken material with tongs or forceps, and place it into the correct sharps or red-bag stream.
Clean and disinfect the area with an approved product and required contact time. Never pick up contaminated broken glass by hand.
Remove personal protective equipment safely, perform hand hygiene, restock the spill kit, and document the event and corrective action.
Step 13: Handle A Needlestick Or Exposure
Wash needlesticks and cuts with soap and water. Flush splashes to the nose, mouth, or skin with water and irrigate eyes with clean water or saline.
Notify the supervisor immediately and obtain confidential medical evaluation without delay under the exposure-control plan. Do not wait until the end of the shift.
Document how and where the incident occurred. Preserve information about the device and source person as permitted, but do not delay care.
Complete required incident, workers' compensation, and sharps-injury records. Review the device, placement, work practice, and training for corrective action.
Required Sharps-Injury Documentation And Follow-Up
Maintain a method for documenting every sharps injury and exposure incident.
At minimum, record information about the injury, the type and brand of device involved when known, the department or work area, and an explanation of how the incident occurred.
Protect the injured employee’s confidentiality by removing personal identifiers from the Sharps Injury Log.
Complete the accident report and document follow-up care within 14 days of the injury incident. Current Cal/OSHA rules require each exposure incident to be entered on the Sharps Injury Log within 14 working days after it is reported.
The CalOptima source protocol states that sites with 10 or fewer employees are exempt from OSHA recordkeeping requirements and from recording and maintaining a Sharps Injury Log. The Clinic Manager must verify whether the exemption applies before relying on it, because applicable California requirements and the site’s Exposure Control Plan control.
The source protocol directs the employee to have blood testing completed within two hours of exposure.
Request the patient’s permission for source-patient blood testing. If the patient denies permission, do not force testing and record the denial. If permission is given, complete testing within two hours when possible.
Per the source protocol, if the patient’s test is negative, additional employee blood tests are not required. If the patient tests positive or refuses testing, the employee is to be tested every six months for one year unless the employee’s test becomes positive. Follow the evaluating healthcare professional’s directions and the current Exposure Control Plan.
Step 14: Remove A Facemask And Eyewear
Wash your hands first.
Handle the facemask only by its ties or strings and discard it in the appropriate container.
Handle eyewear only by the arms.
Step 15: Inspect, Train, And Review
Inspect exam-room sharps containers and red-bag stations during room opening or reset, and inspect the final storage area at least weekly and on pickup day.
Train covered employees at assignment and at least annually, and retrain after a change in tasks, containers, waste streams, vendors, or exposure risk.
Review this SOP after a spill, exposure, missed pickup, rejected container, privacy incident, inspection finding, new service, site change, or law change.
Keep training records, inspection logs, pickup records, corrective actions, vendor credentials, and destruction certificates together so they can be produced during a review.
🛠 Troubleshooting
A Sharps Container Is Full Or Missing
Stop using the room for procedures involving sharps until an approved replacement is installed. Close the full container without compressing it, move it safely to the secure area, and arrange an earlier pickup if storage capacity is limited.
A Sharp Is Found In A Red Bag Or Trash
Do not reach into the bag. Restrict access, notify the Clinic Manager, and use tongs or forceps and appropriate personal protective equipment only if trained and the item can be recovered without unsafe handling. Treat any puncture or exposure immediately.
The Red Bag Is Leaking
Do not carry it against the body. Restrict access, use appropriate personal protective equipment, place it into a compatible second red biohazard bag or approved secondary container, clean the area, and document the correction.
The Monthly Pickup Was Missed
Calculate the oldest waste age and current monthly weight immediately. Contact the vendor for expedited service. Do not exceed applicable storage limits; escalate to an alternate currently registered transporter if needed.
The Clinic Reaches Twenty Pounds In A Month
Notify the Clinic Manager and increase pickup frequency because above-freezing onsite storage is generally limited to seven days at 20 pounds or more per month unless written approval applies.
A Medication Or Chemical Is In The Red Bag
Do not reopen or sort the bag unless the vendor directs a trained person to do so safely. Isolate the container and contact the Clinic Manager and vendor for the correct waste characterization and disposal path.
The Shred Console Is Full Or Damaged
Stop adding documents, secure the material in an approved locked location, contact the shredding vendor for expedited service, and notify the Privacy Officer if unauthorized access may have occurred.
A Document Was Shredded Too Early
Notify the Privacy Officer and records owner immediately. Preserve remaining copies and backups, document the incident, and follow the clinic's retention, legal-hold, and privacy response procedures.
The Correct Waste Stream Is Unknown
Do not guess. Secure the item, review the label and Safety Data Sheet, and contact the Clinic Manager or approved vendor before disposal.
✅ Completion Check
☐ A usable upright sharps container is present in every exam room and remains below its fill line.
☐ Non-sharp biohazardous waste is in tied red biohazard bags inside labeled, covered secondary containers.
☐ No loose sharps, chemicals, medications, batteries, electronics, ordinary trash, or confidential paper are in red bags.
☐ The final storage area is secure, protected, signed, clean, and within the applicable storage-time limit.
☐ The monthly pickup is scheduled, and an earlier pickup is arranged when volume, condition, or storage limits require it.
☐ The transporter registration was verified and pickup documents were checked and filed.
☐ Confidential paper is in a locked console and the certificate of destruction is filed after service.
☐ Spills, exposures, missed pickups, rejected containers, and privacy incidents were reported and corrected.
☐ Supplies were restocked and staff training and inspections are current.
☐ Appropriate PPE is available, protected in storage, and used correctly.
☐ Required biohazard labels and English and Spanish storage signs are present and legible.
☐ Needleless, ESIP, and other safer devices are used unless an approved exemption applies.
☐ Contaminated laundry is labeled, free of sharps, and handled through the approved commercial or onsite laundry process, or the section is documented as not applicable because all items are disposable.
☐ Sharps injuries and exposures are reported immediately, documented confidentially, and managed under the two-hour and follow-up steps in the source protocol and the current Exposure Control Plan.
☐ Facemasks and eyewear are removed by the ties or strings and arms after handwashing.
References
CalOptima Health Facility Site And Medical Record Review Audit Packet: Bloodborne Pathogen And Waste Management, pages 65–71.
Source Protocol Revision (pages 65–68): Apr 29, 2026
Source Protocol Revision (pages 69–71): Jun 15, 2020
This SOP is an operational control document. It does not replace the full law, a site-specific exposure-control plan, Safety Data Sheets, records-retention requirements, vendor instructions, or direction from Orange County, CDPH, Cal OSHA, HHS, emergency responders, or another authority.
Comments (0)