
It is essential that we collect whatever copay is necessary for the Patient visit. If we miss a copay, we are not getting it back from the insurance, so paying close attention is important. This process is intended to help all staff understand how to do certain tasks and actions within the besa EHR in relation to copays. Remember, everything we do is to improve the Patient experience. Take a look below on how we collect or view copays, and remember, what we do will change someone's life.
📚Resources Needed
🚀 Tips & Tricks
- The Copay amount for a Patient is entered into the Patient demographics. From there, various actions are triggered. If nothing is entered or the amount is 0. There will be no automated pop-ups for payment collection.
- We can always check the billing page to see if a copay has been collected or if it hasn’t.
- For all telehealth visits, the Patient is required to submit copay payment prior to joining the video call.
- Copay should be paid by card with a card being saved on file.
- If the Patient has a dot next to their name check with their Care Manager or a support team member to ensure that the insurance has been processed.
📘 Instructions
This will be broken down into 3 parts so that you have a good overall understanding. Please remember, there will only be a Copay option or pop-up if the copay amount has been entered into the Patient Demographics.
Patient Arrival to Clinic
- Login to besa EHR using your credentials.
- When the Patient walks into the clinic you will change the visit status to Arrived.

- When the visit status has changed to Arrived, a pop-up will slide in telling you the insurance information as well as the copay amount that needs to be paid. You will be able to charge the card on file, or collect a new card for payment. Nonetheless the payment should be completed from here so you don’t need to change screens and handle it all in one place. This pop up will slide in from every page you change visit status to Arrived.

- All fields with a * mean they are required.
- If you need to add a payment method for payment, please click the dropdown and complete the form to add a card on file. When all information has been inputted, click + Add Payment Method. This will save the card on file.

- To apply the payment, click on the card that the Patient wants to use for payment. Please confirm with them prior to charging them if the card on file is good to charge.
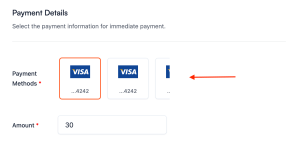
- When you have a card selected, click Save and the payment will process.
- You can also always check to make sure the payment went through by going to the Billing page.
- If you look at the Patient encounter for the respective payment you will see that the Copay has been paid.
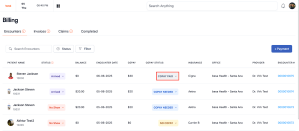
TIP: You can always go to the billing section > encounter tab to see the status of the Patients copay.
Handling Copay Through Billing Page
- In the case that the pop-up slide in did not happen when changing the status to arrived, or you are not sure if you need to collect a copay from the Patient or not, you can go to the billing page.
- You will see the possible status’s for a copay being:

- Copay Needed - We still need to collect
- Copay Paid - Payment has been received and processed
-
No Copay - The insurance does not require a copay
*Copay is only needed when there is a value entered into the copay field of the Patient demographics. If no amount is entered, or it is 0, the Patient will automatically have No Copay status.
- To collect a copay through the billing page, look at a Patient and line item that has a Copay Needed status.

- Scroll all the way to the right and click on the action icon to see the options.

- Click Collect Copay
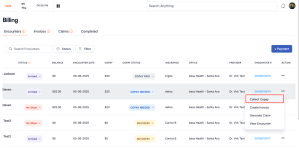
- The Copay pop-up will slide in so you can complete payment. Now you can do everything you would have done if it came in when the visit status changed to arrived.

- All fields with a * mean they are required.
- If you need to add a payment method for payment, please click the dropdown and complete the form to add a card on file. When all information has been inputted, click + Add Payment Method. This will save the card on file.
-
To apply the payment, click on the card that the Patient wants to use for payment. Please confirm with them prior to charging them if the card on file is good to charge.
- When you have a card selected, click Save and the payment will process.
TIP: If the copay has already been collected, when you click on the action icon, Collect Copay will not be there.
Patient has Virtual Visit via Patient App
- When a Patient schedules a virtual appointment, they are only able to meet with us and a provider through the besa Health Patient app.
- In order to schedule a virtual appointment through our app, the Patient must complete all consents and new Patient forms ,which includes adding a payment method.
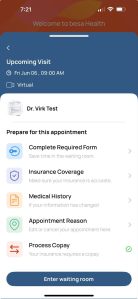
- When the Patient goes to get into the virtual appointment they will see this screen where they can pay the copay.

- If the Patient tried to enter the waiting room without paying the copay they will receive an error message telling them that they need to pay the copay in order to enter the waiting room.
- When they do pay the copay, the Patient will see this green checkmark and will now be able to enter the waiting room and begin the virtual visit.
- Just like in-clinic visits, we can check to make sure the payment went through via the billing page.
Here is a video to help you better understand.
If you have any questions or would like more information, please reach out to support.
Comments (0)